As a Java developer, you'd like to test your code with different Java versions. Or you simply wanted to keep up with the features of a new Java version. Setting up different Java environments often can be a time-consuming and daunting task. This is where version management systems comes in handy! Today, we will discuss one such version manager called jEnv. jEnv is a command line tool to manage multiple java versions on Linux. It is like SDKMAN, but only for Java. jEnv is an updated fork of jenv, which itself is adapted from rbenv. jEnv is quite useful for developing java applications that requires an exact Java version.
Using jEnv, a developer;
- can install and manage several Java installations side by side,
- can setup Java installation on global, directory (application-specific) and even per shell level (shell-specific),
- can switch between different java versions easily and quickly,
- don't need to set JAVA_HOME environment variable for each version.
Install Java
Please note that jEnv will not install Java for you. It will only manage the existing java installations. You should install Java using your package manager or any other way of your choice. I am going to install openjdk 13 and 14 on my Ubuntu system:
$ sudo apt install openjdk-13-jdk
$ sudo apt install openjdk-14-jdk
If you already have installed Java, just ignore this step.
Install jEnv on Linux
Git clone jEnv repository using command:
$ git clone https://github.com/jenv/jenv.git ~/.jenv
The above command will clone the contents of jEnv in a local directory named .jenv.
Then, add jEnv to your $PATH:
$ echo 'export PATH="$HOME/.jenv/bin:$PATH"' >> ~/.bash_profile
Next, initialize jEnv:
$ echo 'eval "$(jenv init -)"' >> ~/.bash_profile
Finally, update the changes we just made in ~/.bash_profile using command.
$ source ~/.bash_profile
If it doesn't work for any reason, just use ~/.bashrc instead of ~/.bash_profile.
$ echo 'export PATH="$HOME/.jenv/bin:$PATH"' >> ~/.bashrc
$ echo 'eval "$(jenv init -)"' >> ~/.bashrc
$ source ~/.bashrc
If you are on Zsh shell, the commands to install jEnv are:
$ echo 'export PATH="$HOME/.jenv/bin:$PATH"' >> ~/.zshrc
$ echo 'eval "$(jenv init -)"' >> ~/.zshrc
Verify jEnv installation
Let us verify if jEnv is installed with command:
$ jenv doctorSample output:
[OK] No JAVA_HOME set [ERROR] Java binary in path is not in the jenv shims. [ERROR] Please check your path, or try using /path/to/java/home is not a valid path to java installation. PATH : /home/ostechnix/.jenv/libexec:/home/ostechnix/.jenv/shims:/home/ostechnix/.jenv/bin:/usr/local/sbin:/usr/local/bin:/usr/sbin:/usr/bin:/sbin:/bin:/usr/games:/usr/local/games:/snap/bin [OK] Jenv is correctly loadedAs, you can see, the output says the JAVA_HOME variable is not yet set and jenv is correctly loaded. Don't mind the other errors. They will be gone after we added Java in the next section.
Now let us set JAVA_HOME environment variable using command:
$ jenv enable-plugin exportYou should restart your current shell session to activate jenv export plugin echo export plugin activated. To restart shell session, run:
$ exec $SHELL -lNow, run again "jenv doctor" command and see what it returns!
$ jenv doctorSample output:
[OK] JAVA_HOME variable probably set by jenv PROMPT [ERROR] Java binary in path is not in the jenv shims. [ERROR] Please check your path, or try using /path/to/java/home is not a valid path to java installation. PATH : /home/ostechnix/.jenv/libexec:/home/ostechnix/.jenv/shims:/home/ostechnix/.jenv/bin:/home/ostechnix/.jenv/shims:/home/ostechnix/.jenv/bin:/usr/local/sbin:/usr/local/bin:/usr/sbin:/usr/bin:/sbin:/bin:/usr/games:/usr/local/games:/snap/bin [OK] Jenv is correctly loadedDone! The JAVA_HOME variable will be automatically set by jEnv depending upon the currently active Java environment.
Manage Multiple Java Versions With jEnv On Linux
Running jEnv without any options will display the help section:
$ jenv
Sample output:
jenv 0.5.3-2-g78dbd7f
Usage: jenv <command> [<args>]

Some useful jenv commands are:
   commands    List all available jenv commands
   local       Set or show the local application-specific Java version
   global      Set or show the global Java version
   shell       Set or show the shell-specific Java version
   rehash      Rehash jenv shims (run this after installing executables)
   version     Show the current Java version and its origin
   versions    List all Java versions available to jenv
   which       Display the full path to an executable
   whence      List all Java versions that contain the given executable
   add         Add JDK into jenv. A alias name will be generated by parsing "java -version"

See `jenv help <command>' for information on a specific command.
For full documentation, see: https://github.com/jenv/jenv/blob/master/README.md
Add different Java environments
Now we need to tell jenv where is our Java environments are located.
First, let us add openjdk-13 environment using command:
$ jenv add /usr/lib/jvm/java-13-openjdk-amd64/
Sample output:
openjdk64-13.0.3 added
13.0.3 added
13.0 added
13 added
Then, add openjdk-14 using command:
$ jenv add /usr/lib/jvm/java-14-openjdk-amd64/
openjdk64-14.0.1 added
14.0.1 added
14.0 added
14 added
Now check all available Java versions to jenv using command:
$ jenv versions
Sample output:
* system (set by /home/ostechnix/.jenv/version)
  13
  13.0
  13.0.3
  14
  14.0
  14.0.1
  openjdk64-13.0.3
  openjdk64-14.0.1
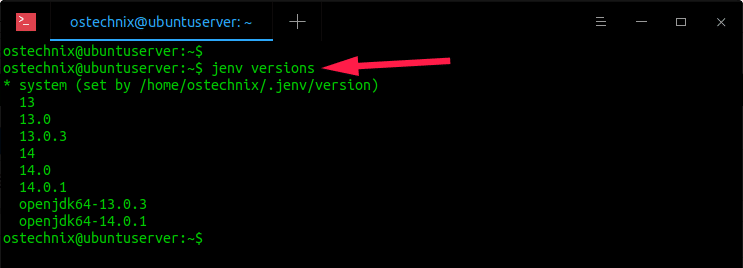
As you can see in the above output, two Java environments i.e. openjdk 13 and openjdk 14 are currently being managed. Never mind the other numbers in the output. They are just aliases referring to the same version.
Set global Java environment
Like I already said, jenv can let you to setup java installation on global or per directory/project, or per shell and switch between them without changing the global version.
Let us check the current Java version:
$ java --version openjdk 14.0.1 2020-04-14 OpenJDK Runtime Environment (build 14.0.1+7-Ubuntu-1ubuntu1) OpenJDK 64-Bit Server VM (build 14.0.1+7-Ubuntu-1ubuntu1, mixed mode, sharing)As you see in the output, the current global version has been set to openjdk-14.
To set openjdk-13 as global version, run:
$ jenv global openjdk64-13.0.3Now check the Java version:
$ java --version openjdk 13.0.3 2020-04-14 OpenJDK Runtime Environment (build 13.0.3+3-Ubuntu-1ubuntu2) OpenJDK 64-Bit Server VM (build 13.0.3+3-Ubuntu-1ubuntu2, mixed mode)

You can also just use the alias numbers instead of full version like below:
$ jenv global 13
$ jenv global 13.0
$ jenv global 13.0.3
All of these three commands will set openjdk-13 as global version.
Set local or per-directory Java environment
Sometimes, you might want to set java environment for a specific project, without changing the global version.
For example, the following steps will set openjdk-14 as local version for our project named "ostechnix-java", but will not change the global version.
$ mkdir ostechnix-java
$ cd ostechnix-java
$ jenv local openjdk64-14.0.1

Now our local environment is openjdk-14, but the global java environment is openjdk-13. Similarly you can set multiple different Java environment for each application. Just go to the project's directory and set the desired Java environment of your choice and start building or testing the application. It is that simple!
Set shell-specific Java environment
To set Java environment for the current shell session, run:
$ jenv shell openjdk64-14.0.1Openjdk-14 is the Java version used in this particular shell. Once you exit the current shell session, the previous globally used Java version will come into effective.
No need to set $JAVA_HOME!
Did you notice that I never set $JAVA_HOME variable when switching to different Java versions? No, Not even once! Jenv will take care of it and will automatically set it for you depending on the Java environment you are in.
You can view current setting of JAVA_HOME variable using command:
$ echo $JAVA_HOME /home/ostechnix/.jenv/versions/openjdk64-13.0.3Just forget how to set the JAVA_HOME environment variable and focus on your developement.
